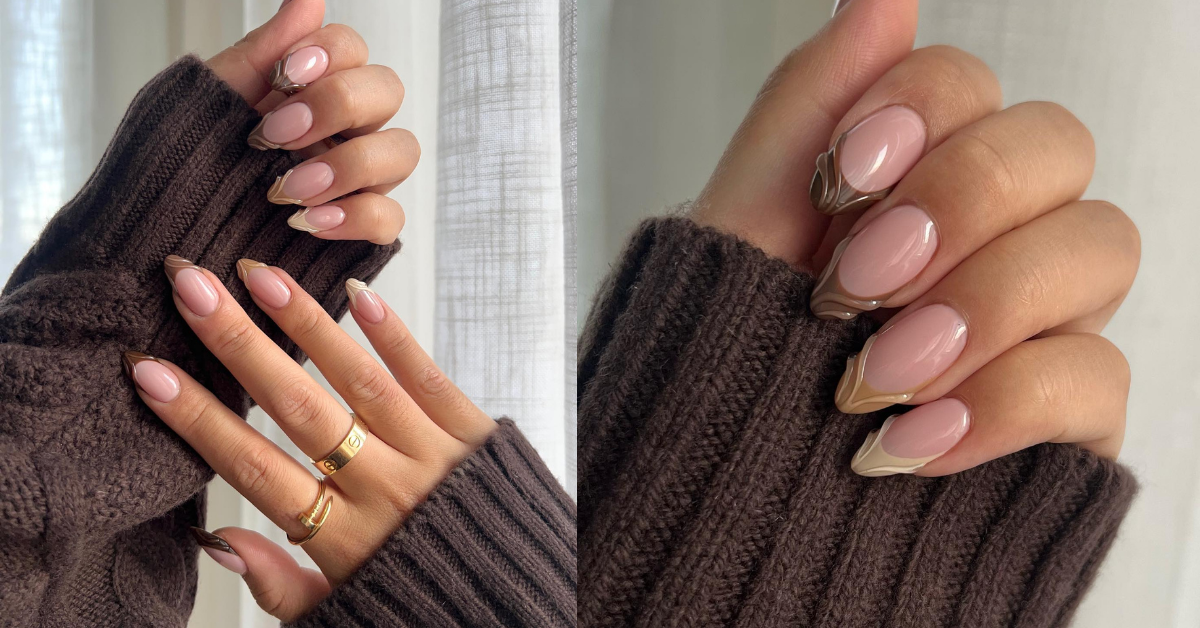
The “clean nail” look is basically healthy-looking, softly tinted, glossy nails that read neat from a foot away and beautiful up close. Think: tidy cuticles, a smooth surface, and a sheer milky pink or milky white that makes your nails look like your nails… just upgraded.
The reason people miss the mark is they focus on polish color first. But this trend is 80% prep, 20% polish. A sheer shade will highlight everything underneath it. That’s why gel manicures make this look feel easier: they hide texture and last longer. The good news is you can absolutely get the same vibe with regular polish, as long as you do the boring parts.
One real limitation up front: if your nails are peeling, deeply ridged, or stained, the “clean” look takes a little longer to earn. You can still do it today, but it’ll be more “clean and polished” than “glass-smooth.”
Quick answer for skimmers
- The clean nail look = short-to-medium length, tidy cuticles, sheer milky polish, and a very glossy top coat.
- Prep matters most: shape, gently push back cuticles (don’t cut), lightly smooth the surface, then hydrate.
- Pick a polish that’s sheer and buildable (1-3 thin coats). “Milky” and “strawberry milk” style shades are a popular lane of this look.
- If you have ridges: use a ridge-filling base coat and keep coats thin.
- For longevity: cap the free edge and refresh top coat on day 3-4.
- Cuticle care is not optional. Dermatologists specifically advise not removing/cutting the cuticle because it protects the nail area.
If you only do one thing: do a 5-minute prep (shape + soften and push back cuticles + oil), then apply one sheer milky coat + top coat. The “clean” effect comes from neat edges and shine, not thick coverage.
What “clean nails” actually means
Beauty writers describe “clean nails” as minimal, well-groomed, and “my nails but better,” not nail art or heavy structure.
You’re aiming for:
- Even shape (no snags)
- Smooth-ish surface (not aggressively buffed thin)
- Tidy cuticle line
- Soft tint (milky pink, sheer nude, milky white)
- High gloss finish
If you try to get the look using only polish, it can turn streaky or look like you’re wearing sheer polish on un-prepped nails. Prep is the difference.
The decision framework: pick your “clean nail” lane
Lane 1: The easiest (looks good on almost everyone)
Sheer milky pink + glossy top coat
This is the “your nails but healthier” version and the most forgiving.
Lane 2: The brightest
Milky white (not stark white) + ultra gloss
This is the look that’s been called out as a minimalist trend on celebrities, and it reads very crisp.
Trade-off: it can show yellowing or unevenness underneath more than pink does.
Lane 3: The truly natural
No color, just buff + oil + clear top coat (or even no top coat)
This is optional. Skip it if you’re ridge-prone because buffing can make ridges look better short term, but over-buffing can thin nails.
Lane 4: The “soap nails” vibe
Sheer nude-pink + extremely glossy finish
“Soap nails” is basically clean nails turned up: hydrated hands, neat cuticles, milky tint, wet-looking shine.
Step 1: Shape like a minimalist
Pick a shape that supports the “clean” vibe:
- Short squoval (square with softened corners) is the easiest and strongest for natural nails.
- Short oval looks soft and elongating.
How to do it:
- Clip only if needed.
- File in one direction (gentle strokes) to reduce splitting.
- Match all nails to the shortest nail. (This one hurts emotionally, but it looks the most polished.)
Step 2: Cuticles, done safely
This part matters more than people think. The cuticle area is what makes nails look freshly groomed.
- Soften first (post-shower, or soak fingertips briefly), then gently push back.
- Avoid cutting or “removing” the cuticle. The American Academy of Dermatology explicitly advises not removing the cuticle because it can damage the nail and increase problems.
- If you cut or nick the skin around the nail, bacteria can get in and cause infections like paronychia.
The clean look secret: push back gently, then wipe away only loose dead skin (if you must), not living tissue.
Step 3: Smooth, but don’t sand your nails into sadness
A light smooth surface helps sheer polish look expensive.
If you have visible ridges, experts commonly suggest either:
- gentle buffing (light pressure, not too often), or
- a ridge-filling base coat that levels things out.
Here’s the thing: buffing is a real trade-off. It gives instant smoothness, but too much can thin nails. There isn’t a magical workaround. Your best “no regret” move is minimal buffing + ridge filler.
A safe-ish approach:
- Buff only the roughest areas very lightly.
- Stop the second you see a smooth sheen.
- If you’re a chronic over-buff person, skip buffing and use ridge filler instead.
Step 4: The principle that keeps it from looking cheap
The clean nail look is thin layers and clean edges.
- Thick coats = streaks, bubbles, dents, and that “DIY” look.
- Thin coats = smooth, glassy finish.
If you remember nothing else: two thin coats beat one thick coat every time.
The actual polish routine (regular polish, no gel)
What you need
- Base coat (ridge filler if you need it)
- Sheer milky polish
- High-gloss top coat
- Cuticle oil
- Small cleanup brush or cotton swab
Step-by-step
- Dehydrate the nail plate lightly
Wipe nails with remover or alcohol to remove oils (oil causes lifting and patchy polish). - Base coat
- Ridge-filling base coat if needed
- Otherwise a standard base coat
- Sheer color: 1-3 thin coats
- Coat 1: looks streaky, ignore it
- Coat 2: looks “clean nails”
- Coat 3: only if you want more milkiness
- Glossy top coat
Use a generous but controlled layer. This is where the “expensive” finish comes from. - Clean up edges
This is the step people skip, and it’s the step that makes it look like a salon manicure. - Oil last
Once polish is touch-dry, oil around the cuticles (not on top of the polish while it’s wet).
How to make it last without gel
- Cap the free edge: swipe base, color, and top coat across the tip of the nail.
- Wear gloves for dishes and cleaning. Too much water exposure can weaken nails and contribute to splitting.
- Top coat refresh on day 3 or 4: one thin coat brings the shine back and reduces chipping.
- Don’t pick. (I know.)
If your polish always chips fast, it’s often because nails are a bit oily, prep was rushed, or coats were thick.
“No polish” clean nails (if you want truly bare)
This is optional. Skip it if you’re trying to grow out peeling nails.
- Shape neatly.
- Soften and gently push back cuticles.
- Very light buff (or none).
- Cuticle oil + hand cream.
- If you want shine, use a clear top coat or a nail strengthener.
This version looks especially good if your nail beds are naturally even-toned.
Variations by real-life nail problems
If your nails are ridged
- Ridge-filling base coat is your best friend.
- Keep color coats extra thin (ridges + thick sheer polish = visible texture).
If your nails are stained or yellowing
- Choose milky pink over milky white (more forgiving).
- Use a base coat every time.
If your nails peel or break easily
- Cuticle oil consistently helps the nail area stay hydrated and can reduce cracking and peeling, according to dermatologist quotes in beauty coverage.
- Avoid aggressive buffing and harsh removal habits.
If your cuticles are dry and ragged
Women’s cuticle-care guidance stresses softening before pushing back to reduce skin breaks.
Also: skin breaks around nails raise infection risk.
The two biggest “dated” tells (and how to avoid them)
- Stark, opaque white
Clean nails are usually milky, not bright-out. A softer white reads modern and natural. - Visible polish on the skin
Clean up the edges. It matters.
FAQ
Can I push back cuticles without cutting them?
Yes. Dermatology sources recommend not cutting/removing cuticles because they help protect the nail area.
How do I avoid that streaky sheer-polish look?
Thin coats, let each coat set a bit, and use a smoothing base coat if needed. Also, accept that the first coat looks messy. The second coat is where it becomes pretty.
Should I buff my nails for this look?
Only lightly, and not constantly. Gentle buffing can help ridges, but overdoing it can cause weakness.
What if my nails are very short?
Short nails can look extremely “clean.” Squoval is a great shape for short nails because it looks tidy and strong.
How do I remove polish without wrecking nails?
Be gentle, don’t scrape, and moisturize after. Solvents like acetone can dry out skin with prolonged exposure, so follow with oil/cream and don’t overuse.
Is “soap nails” the same as clean nails?
They overlap. Soap nails lean extra glossy and extra hydrated, with a sheer nude-pink tint.
Just a little note - some of the links on here may be affiliate links, which means I might earn a small commission if you decide to shop through them (at no extra cost to you!). I only post content which I'm truly enthusiastic about and would suggest to others.
And as you know, I seriously love seeing your takes on the looks and ideas on here - that means the world to me! If you recreate something, please share it here in the comments or feel free to send me a pic. I'm always excited to meet y'all! ✨🤍
Xoxo Charlotte
